Ginger Soy Chicken Meatballs with Chinese Broccoli
With temperatures finally beginning to cool down, dinner table dishes are about to start getting a lot heartier. This dish of Ginger Soy Chicken Meatballs with Chinese Broccoli is the perfect mix of hearty and healthy.
The broth is full of flavor, just like the meatballs and the Chinese broccoli. I like it spicy so feel free to edit the spices out of your preparation.

Chinese broccoli, aka Chinese kale, is a bitter green with thick stems.
- 1/2 piece of ginger, minced
- 1 garlic clove, minced
- 4 scallions, sliced and divided into light and dark
- 12 oz. Chinese broccoli, cut into 1-inch pieces
- 12 oz. ground chicken
- 1 TBSP chili oil
- 2 TBSP soy sauce
- 1/2 tsp crushed red pepper (optional)
- 1 cup coconut milk
- 1 cup reduced sodium chicken broth
- Salt and pepper to taste
Directions:
- In a large bowl, combine ginger, garlic, light scallion slices, chicken and soy sauce. Season with salt and pepper.
- Mix ingredients by hand until well combined, then form into roughly 10 one-inch balls. (Side note: Make sure you wash your hands after this step — we all know how nasty raw chicken is.)
- Heat the chili oil in a large pan over medium heat. When oil is shimmering, add the meatballs and cook until they’re browned on all sides (roughly 8-10 minutes).
- Transfer meatballs to a plate.
- Add Chinese broccoli to pan along with crushed red pepper. Saute broccoli four minutes over medium heat until it’s bright green.
- Add chicken stock and coconut milk to pan and stir to combine, scraping up brown bits from bottom of pan.
- Add meatballs, increase heat to high, and bring to a boil.
- Reduce heat to medium low and simmer everything for 5-8 minutes.
- Taste broth and add salt and pepper, if needed.
- Divide broth, meatballs and Chinese broccoli between two bowls. Garnish with dark scallions and serve.

Simmering all the ingredients.
The meatballs will hit you with a nice bit of ginger and soy and the broth should hit you with a nice heat from the chili oil.
Plus, the Chinese broccoli adds a nice crunch to the dish so you’ve just about got it all in one dish.
This recipe was adapted from Plated.com.
Tags: Chicken, Chinese Broccoli, Fall Dish, Garlic, Ginger, Healthy Dish, Hearty Dish, Meatballs, Scallions, Soy, Winter Dish

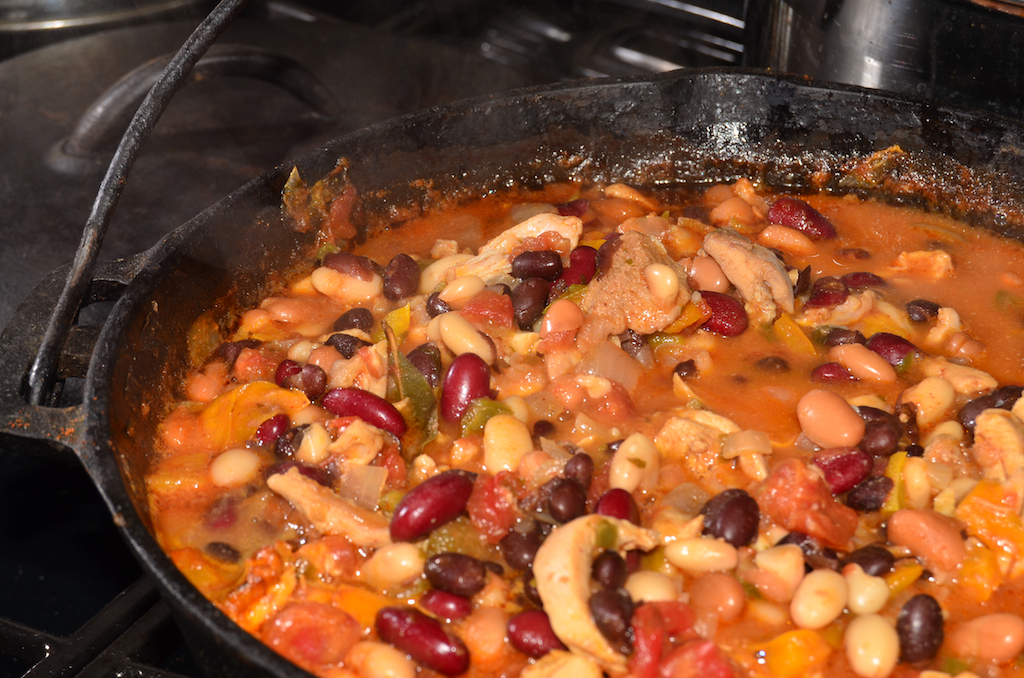
Spicy Chicken Chili
Cold temps may be on the way out (fingers crossed), but there’s still time to make chili. Using chicken thighs, I made this Spicy Chicken Chili.
This is a very simple dish to make that’s full of healthy ingredients. I used dark meat, but if you want it even healthier, you can use white mean. But I actually prefer dark meat for the flavor in slow-cooked dishes.
Ingredients:
Directions:
- In a large pot or saucepan, heat the oil over medium-low heat. Add the onion and garlic and cook for 3 minutes, or until they soften.
- Increase the heat to medium and add the chicken. Cook about two minutes until the strips are no longer pink.
- Stir in the salt, white pepper, chili powder and cumin.
- Add the jalapeños and the tomatoes with their juice.
- Bring to a boil, reduce the heat, cover and simmer for 15 minutes.
- Uncover and stir in the beans and black pepper. Simmer until the chili has thickened (about 15 minutes longer).
- Spoon chili into bowls and garnish with cilantro, sour cream and shredded cheese (if desired)
If the chili seems to spicy for you, remove a tablespoon of chili powder and take out a jalapeño or two. Also, if your chili is a little too thick, cut it with some chicken broth (or water if you don’t have chicken broth).
I served my Spicy Chicken Chili with Jalapeño and Cheddar Cornbread (cornbread I don’t share the recipe for). You can also sub in different kind of beans as you see fit. Chili is a really versatile dish so use your culinary imagination.
Tags: Chicken, Chicken Thighs, Chili, Cumin, Jalapeno, One Pot Meal, Spicy

Chickpea, Piquillo Pepper and Chicken Soup
Need a quick recipe for a busy weeknight? This recipe for Chickpea, Piquillo Pepper and Chicken Soup takes no time at all. The secret is using ingredients with lots of flavor, like hummus and piquillo peppers.

A perfect, creamy soup for Fall weather.
You’ll save a ton of time without sacrificing flavor. And it’s perfect for the upcoming (or already arrived) cold weather.
Ingredients:
- 1 cup drained piquillo peppers, 1/4 cup cut into thin strips
- 2 cups reduced-sodium chicken broth
- 1 cup shredded rotisserie chicken
- 1/2 cup cooked rice (white or brown)
- 3/4 cups hummus
- 2 TBSP cilantro
- 1 tsp hot sauce
- Olive oil, for serving
- Salt and pepper, to taste
Directions:
- In a food processor, puree the whole piquillo peppers, hummus and chicken stock until smooth.

This recipe uses very few ingredients.
- Transfer the soup to a Dutch oven.
- Add the chicken, rice and hot sauce, season with salt and pepper, then bring to a boil.
- Ladle the soup into bowls and garnish with olive oil, cilantro, sliced piquillo peppers and more hot sauce (if desired).
Four pretty simple steps, right? It’s not a backbreaking recipe by any means and the flavors are awesome for such a quick recipe.
I had no problem finding jarred piquillo peppers at my local grocery store, but if you can’t find them, roasted red peppers are a suitable substitution.
Tags: Chicken, Chickpea, Dutch Oven, Hummus, One Pot Meal, Piquillo Pepper, Quick Recipe, Soup, Soup Recipe

Sour Cream Chicken Enchiladas
I must confess I really miss good Tex-Mex cuisine. Living in Texas for 11 years definitely spoiled me. And as much as I love New Orleans, it’s not a hot spot for Tex-Mex.
So I have to do it myself. Last week I had a very specific craving for Sour Cream Chicken Enchiladas so I made some. Here’s my recipe.
Ingredients:
Directions:
- Preheat oven to 350F and grease a 9×13 casserole dish.
- Heat 2 TBSP vegetable oil in a small skillet over medium-high heat. Fry tortillas for 10 seconds on each side. Then place them on a paper towel-lined plate to drain.
- In a separate skillet, heat 1 TBSP vegetable oil over medium heat. Saute onion and jalapeño for 1 minute.
- Add chicken, 1 can of the green chillies and 1 TBSP paprika. Stir together.

Sour Cream Chicken Enchiladas Before Baking
- Add heavy cream and 1/2 cup chicken broth and stir. Allow mixture to bubble and get hot then turn off heat and set aside.
- In a separate large skillet, melt butter over medium heat and add in flour. Whisk together and cook for a minute or two.
- Pour in remaining chicken broth, whisk together and cook for an additional one to two minutes.
- Stir in remaining can of green chillies, reduce heat to low and add sour cream. Add 1 1/2 cups shredded cheese and stir to melt.
- Add 1 TBSP paprika and salt and pepper to taste.
- To assemble, spoon chicken mixture on to tortillas, individually. Top with cheese then roll. Place rolled enchiladas seam side down in 9 x 13 casserole dish.
- Pour cheese mixture on top of prepared enchiladas. Top with any remaining cheese you have.
- Bake for 30 minutes. Then let cool slightly, top with chopped cilantro and serve.
Feel free to add in more green chillies or jalapeño if you want a spicier version. These can be made ahead and reheated before serving. I served mine with refried black beans, half a sliced avocado and of course a fresh margarita.
These definitely conquered my craving, but I wish more New Orleans Tex-Mex options were available. Until then, I’ll have to make my own Tex-Mex.
Tags: Cheese, Chicken, Chicken Recipe, Green Chillies, Mexican, Mexican Food, Mexican Recipe, Sour Cream, Tortillas

Cold Fried Chicken
To me, there are some foods that are just as good served cold as they are served warm/hot. Spaghetti, pizza, steak and fried chicken all come to mind. So I decided to try out a recipe for fried chicken, but to serve it cold — hence, Cold Fried Chicken.
The prep work for serving it cold is obviously no different than serving it warm. However, once cooked, you must make sure the chicken cools to room temperature before refrigerating. This helps the batter keep its crunch and prevents sweating between the batter and chicken meat.
Ingredients:
- 1 fryer chicken, cut into 8 pieces (2 wings, 2 thighs, 2 legs, 2 breasts)
- 2 cups buttermilk
- 1/4 cup honey
- 6 cloves garlic, roasted
- 1/4 cup water
- 6 TBSP hot sauce
- 3 cups all-purpose flour
- 1 TBSP black pepper
- 1 TBSP garlic powder
- 1 TBSP red pepper
- 1 TBSP paprika
- 1 TBSP cayenne pepper
- 1 TBSP salt
- Peanut oil, for frying
Directions:
- Rinse the chicken pieces and dry with a paper towel.
- In a large bowl, combine buttermilk, water, honey and roasted garlic. Then soak the chicken pieces in the buttermilk mixture for at least 2 hours and up to 24 hours.
- On a large platter, place flour and mix in spices. Mix well so the spices are nicely incorporated into the flour. Taste flour and adjust seasoning as you see fit.
- Roll the marinated chicken pieces in the flour mixture until well coated. Dip chicken back in buttermilk mixture and coat in flour again.
- Heat 1 inch of peanut oil in large skillet or Dutch oven to 375F. While oil is heating, leave chicken sitting in flour mixture.

Fried Chicken is popular with my taste buds.
- Working in batches of 3 or 4 pieces, add chicken to oil skin side down.
- Fry for 5 minutes then turn to other side and fry for an additional 5 minutes. Continue to turn and fry 5 minutes per side for a total of 20 minutes (two 5-minute periods per side) until golden-brown. Use a meat thermometer to ensure chicken is cooked to an internal temperature of 165F.
- Remove the chicken from the skillet and place on a paper towel-lined plate to drain.
- Repeat frying process with remaining pieces.
- Once all chicken is cooked, let cool to room temperature before refrigerating. Refrigerate for several hours before serving cold.
This is some damn good fried chicken that keeps its crisp whether it’s hot or cold. It’s perfect for a summer picnic.
This is one of those dishes that’s actually better on the second day once it’s sat in the refrigerator for a while. After trying this Cold Fried Chicken, you may not want to go back to eating it hot.
Tags: Chicken, Chicken Recipe, Cold Fried Chicken, Fried Chicken, Recipe, Southern Recipe

Honey-Lime Glazed Chicken Thighs
I’m not ashamed to admit that chicken thighs are my favorite cuts of chicken. They have the most flavor and don’t dry out the way breasts can.
This is a simple recipe that relies on three things: spices, a glaze and a broiler. I went for boneless, skinless chicken thighs to keep it on the healthy side, but I’m sure it’s just as good, if not better, with skin-on, bone-in chicken thighs.
Ingredients:
- 6 boneless, skinless chicken thighs
- Juice of one lime
- 6 TBSP honey
- 2 TBSP apple cider vinegar
- 2 tsp garlic powder
- 1 tsp white pepper
- 1 tsp black pepper
- 1 tsp salt
- 3 tsp chili powder
- 1 tsp ground cumin
- 1 tsp Aleppo pepper (or ground red pepper)
- 2 tsp red pepper flakes

Honey-Lime Glazed Chicken Thighs Broiling in the Oven
- Set broiler to high.
- In a small bowl, whisk together lime juice, cider vinegar and honey. Set aside.
- In a medium bowl, mix together all spices. Add chicken thighs and toss to coat completely.
- Place thighs on a broiler pan (or foil-lined baking sheet) and broil for 5-6 minutes on each side.
- Remove from oven and brush one side with half of honey-lime glaze. Broil for 1 minute then glaze and broil the remaining side another minute.
- Serve with sides of your choice.
In my experience, chicken thighs are even better the second day so I would encourage you to make this and eat it the next day. Doing so will allow the spices to settle into the meat even more.
This is a very easy recipe with a nice kick that won’t blow your waistline.
Tags: Chicken, Chicken Recipe, Chicken Thighs, Honey, Lime, Recipe

Grapefruit Chicken
I’ve heard of orange chicken, lemon chicken, even lime chicken, but I can’t say I’ve ever thought about using chicken and grapefruit in a dish. I happened to have both on hand so I figured what the hell. I have to say I was very pleased with the results of Grapefruit Chicken.
The sweet-tart flavors of the grapefruit really went well with the chicken. I used half of the grapefruit juice I was able to get as a marinade and the other half in the dish and as a reduction to go over the chicken once done.
Ingredients:
- 2 grapefruits
- 2 boneless, skinless chicken breasts
- 2 TBSP brown sugar

The Grapefruit Reduction
- 1 TBSP honey
- 1/4 cup olive oil
- Salt and pepper, to taste
Directions:
- Preheat oven to 425F.
- Juice one grapefruit into a large bowl.
- For the second grapefruit, cut it into sections making sure to cut off any of the pith (white stuff). Place the segments in a medium saute pan.
- To the juice, add the brown sugar and honey. Whisk to combine all. Pour half the mixture into the saute pan. Bring to a simmer and cook until slightly thickened.

An overhead view of Grapefruit Chicken
- With the remaining half of juice mixture, add the olive oil, salt and pepper. Whisk to combine. Then place chicken in marinade and coat well. Cover and let marinate for 25 to 30 minutes.
- After 30 minutes, oil a baking pan and place in chicken breasts. Bake for 20-25 minutes or until chicken temperature reads 185F on a meat thermometer.
- Serve chicken breasts over rice, finishing with the grapefruit wedges and reduction sauce.
Tip: If you want a nice browning, after 15-20 minutes, turn on the broiler and leave breasts under the broiler for 5 minutes. But make sure the internal temperature is still 185F before removing from the oven.
This dish has me seriously reconsidering my stance on grapefruits. I might not be able to eat them alone, but I now know I can work with them.
Tags: Chicken, Chicken Recipe, Citrus, Dinner, Grapefruit, Recipe

Chicken Taco Towers
While I won’t go as far as to say chicken tacos are boring, they just need a little extra pizazz. So I decided to mix it up by creating some vertical tacos or what I call Chicken Taco Towers.
The key to successful Chicken Taco Towers is a biscuit cutter or a round cuter of some sort. Not only will it be necessary to cut the tortillas uniformly, but it will help you stack things.
Ingredients:
- 2 boneless, skinless chicken breasts, cut into bite-sized pieces
- 2 avocados, diced
- 1/2 red onion, finely diced
- 1 can black beans, drained and dried
- 4 tortillas, corn or flour
- 1 cup shredded pepper jack cheese and/or cheddar cheese
- 1/2 cup shredded lettuce
- 1 tomato, diced
- 1 tsp chili powder
- Juice of 1 lime
- 3 TBSP olive oil
- Salt and pepper to taste

Chicken Taco Tower Close-Up
- Using the biscuit cutter, cut circles into tortillas. (If you don’t want to discard the remnants, I would suggest cutting them into bite-sized pieces, sprinkling with salt and baking on baking sheet in an even layer at 400F to make some tortilla chips.)
- In a medium skillet over medium-high heat, heat oil and sauté chicken pieces, lime juice, chili powder, onion, salt and pepper. Continue cooking until all chicken pieces are cooked and/or register 185F on a meat thermometer.
- Once chicken is cooked and tortilla circles are ready, you can begin assembling the Chicken Taco Towers. Using the biscuit cutter and starting with a tortilla circle, layer beans, chicken, cheese, avocado, lettuce and tomato.
- Be sure to move the biscuit cutter up as you stack and press down the layers firmly before adding another one. I experimented and found the beans best on the bottom. Also, I highly recommend adding chicken with cheese for a melty effect. And, I would save the lettuce for last so it doesn’t get too compressed.
If this assembly is too fancy for you, there’s nothing wrong with making traditional chicken soft tacos. The flavor will be virtually the same. Honestly, I was testing out using my biscuit cutter for layering so I was exploring.
Chicken Taco Towers are just a new look for the tacos we’ve all come to love. And let’s face, some tacos can look pretty sloppy so at least give this method a try.
Tags: Chicken, Chicken Tacos, Food, Mexican, Mexican Food Recipe, Mexican Recipe, Recipe, Tacos

Cashew Chicken
Cashew Chicken is a dish that’s popular in most Chinese and/or Thai restaurants. It’s a versatile given the fact you can throw in the veggies of your choice as long as the chicken and cashews are a constant.
This recipe includes a sweet/spicy sauces to accompany the veggies, chicken and cashews. The best part is that it’s loaded with nutrient-rich veggies and protein-rich chicken.
Ingredients:
- 4 boneless, skinless chicken thighs (cut into bite-sized pieces)
- 1/2 red pepper
- 1/2 white onion
- 3 garlic cloves, finely chopped
- 1 TBSP cornstarch (dissolved in 3 TBSP water)
- 2 TBSP vegetable oil
- 1 cup broccoli florets
- 4 green onions, cut into thirds
- 4 leaves of purple or green cabbage, chopped
- 1/2 cup cashews, dry roasted
- 1 cup shiitake mushrooms
- 1/4 cup chicken broth
Marinade:
- 2 tsp cornstarch
- 2 TBSP soy sauce
- 1 TBSP water
Sauce:
- 3 TBSP dry white wine
- 1 cup chicken broth
- 2 TBSP soy sauce
- 1 tsp sriracha sauce
- 1 TBSP rice vinegar
- 2 TBSP fish sauce
- 2 TBSP brown sugar

Veggies for Cashew Chicken
- To make the marinade, dissolve 2 tsp of cornstarch in 2 TBSP of soy sauce and 1 TBSP of water in a medium-sized bowl. Add chicken pieces and stir to combine. Set aside to marinate for at least 30 minutes.
- Combine all sauce ingredients and whisk to mix to make the sauce.
- In a wok or large pan, saute the onion, garlic, red pepper, broccoli and green onion in oil over medium-high heat for about two minutes.
- Add the marinated chicken and mushrooms. Continue stir frying until chicken pieces are cooked (up to five minutes). If the wok becomes dry, add broth or white wine (1 TBSP at a time).
- Add the cabbage and continue stir frying another 2 minutes.
- Add the sauce and cashews to the wok then add the cornstarch powder dissolved in water and soy sauce. Continuing stirring until all ingredients are well combine and the sauce thickens.
- While cooking, taste test for salt and sweetness. If it’s too sour, add more sugar. If it’s not salty enough, add more fish sauce.
- Serve over rice or noodles.
If you don’t own a wok, I highly suggest investing in one. They’re perfect for stir-fry dishes such as Cashew Chicken. This recipe should suffice when you don’t have the time venture to your local Chinese or Thai restaurant.
Also, a side note, but I used salt and pepper cashews from Whole Foods to give my version a little extra kick. Though regular dry-roasted cashews should work just fine.
Tags: Cashew, Cashew Chicken, Chicken, Chinese Food, Recipe, Stir-Fry, Thai Food, Vegetables, Wok, Wok Recipe

Rainbow-Stuffed Chicken
No, it’s not chicken stuffed with Skittles. Bell peppers are the inspiration and filling in Rainbow-Stuffed Chicken. Bell peppers are awesome to cook with since they virtually come in all colors of the rainbow (except maybe blue).
I also add red onion (which is, let’s face it, really purple), mushrooms and cheese to the multicolor bell pepper blend. The whole blend is really versatile and can be used to complement any dish.
Ingredients:
Directions:
- Preheat oven to 400F and grease a large baking sheet or pan.
- In a large bowl, combine bell peppers, mushrooms, onion and cheese.
- Half the chicken breasts horizontally, but don’t cut all the way through, making a envelope for the bell pepper blend. Season chicken with salt and pepper or seasonings of your choice.
- Stuff the chicken breasts with bell pepper blend. And press down to seal in stuffing. You can also tie with twine if you have any handy.

Prepped Rainbow-Stuffed Chicken
- Bake for 40-45 minutes or until chicken temperature registers between 170F and 180F.
- Remove chicken from oven, let cool for a couple minutes, then serve.
Not only is this a colorful dish, it’s full of flavor and healthy nutrients from the veggies in the bell pepper blend. I don’t have a kid, but I imagine this is a fairly kid-friendly recipe.
Feel free to add any other veggies you have on hand to the bell pepper blend. If you have any of the bell pepper blend left over, it goes great with eggs to make a quiche or quick scramble.
Tags: Bell Peppers, Chicken, Chicken Breast, Entree, Kid-Friendly, Mushrooms, Recipe