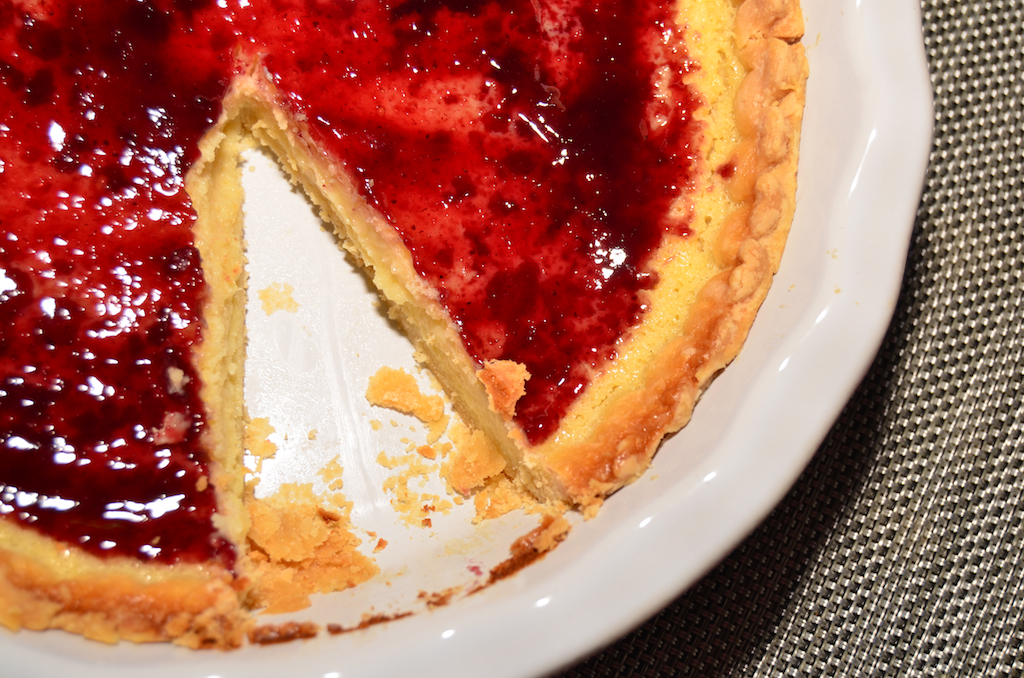
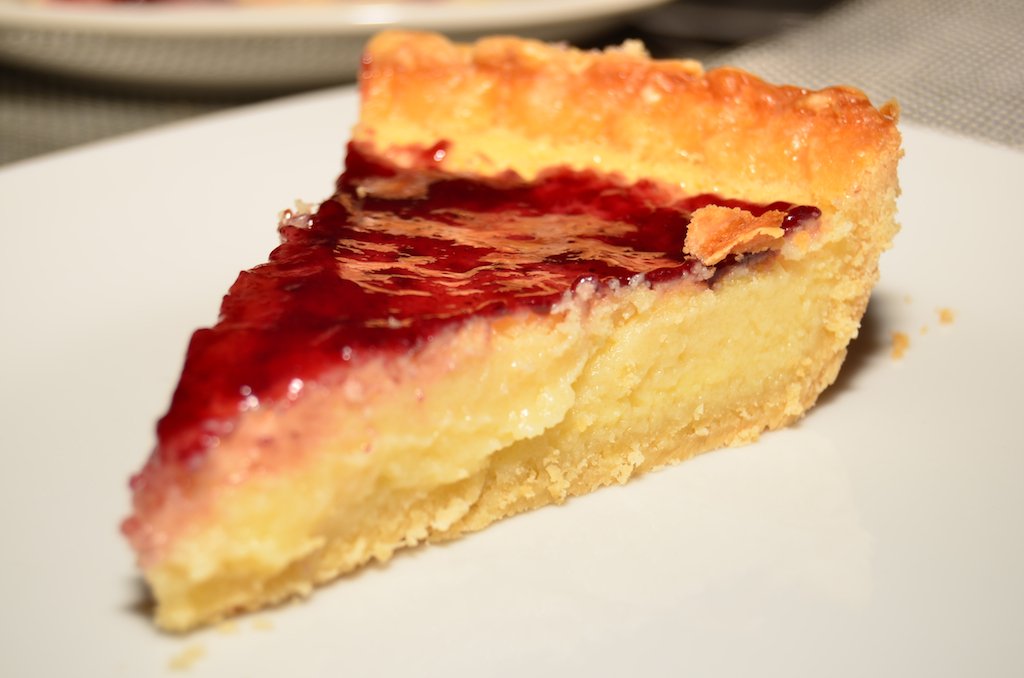
Buttermilk Pie with Blackberry Jam
Buttermilk pie is a classic Southern dessert. Its custard-like feeling is cool and creamy and perfect for Spring and Summer (think picnic).
This Buttermilk Pie with Blackberry Jam recipe is very versatile since it’s a breeze to make and you can really top with any jam you want.

One slice may not be enough.
Ingredients:
- 1 TBSP flour
- 1 1/2 cups sugar
- 1 cup buttermilk
- 4 eggs
- 1 stick of unsalted butter, melted
- 1 TBSP grated lemon zest
- 1 unbaked 10-inch pie crust
- Pinch of salt
- 1/2 cup blackberry jam
Directions:
- Preheat the oven to 350F.
- In a large bowl, combine sugar, flour, salt and lemon zest.
- Whisk in the eggs, one at a time.
- Stir in the buttermilk and melted butter.
- Pour the buttermilk mixture into the pie shell and bake until the center sets (about 25-30 minutes).
- Let pie cool then spread jam all over top of pie.
- Slice and serve. Garnish with whipped cream (if desired).

Buttermilk Pie with Blackberry Jam is perfect when you want a dessert that’s not too sweet.
While this isn’t on my current diet (beach season is quickly approaching), I will totally admit that I indulged in a couple slices a few weeks ago. One just wasn’t enough.
Buttermilk Pie with Blackberry Jam is perfect to take on a picnic or as a dessert to a friend’s dinner party. I guarantee it will be a hit and you most likely won’t have any left over.
Tags: Blackberry, Buttermilk, Buttermilk Pie, Custard, Dessert, Dessert Recipe, Pie, Pie Recipe, Southern Dessert, Southern Dish, Southern Recipe, Summer Dessert, Vegetarian, Vegetarian Recipe

Nutella Swirl Pound Cake
Love Nutella? Welcome to the club! Not a fan of Nutella? I’m not even sure what to say to you and this recipe isn’t for you.
If you are part of the club, you’ll love this recipe for Nutella Swirl Pound Cake. Talk about delicious, rich and decadent.
Ingredients:
- 1 1/2 cups all-purpose flour
- 2 sticks unsalted butter, softened
- 4 large eggs
- 1 1/2 TBSP cocoa powder
- 2 tsp vanilla extract
- 1 1/4 cup sugar
- 1/4 tsp salt
- 1 jar of Nutella (13 oz.)
- 1 tsp baking powder
Directions:
-
- Preheat the oven to 325°.
- Grease a 9×5-inch loaf pan.
- In a small bowl, whisk the eggs with vanilla extract.
- In a medium bowl, whisk the flour, cocoa powder, baking powder and salt.

Who doesn’t love Nutella?
- In a large bowl, beat the butter with the sugar until fluffy.
- Gradually beat in the egg mixture until full incorporated.
- In three batches, beat in the flour mixture until incorporated.
- Spread 1/3 of the batter into the loaf pan then spread half the Nutella on top. Repeat with another 1/3 of the batter and the remaining Nutella. Top with the remaining 1/3 of the batter.
- Lightly swirl the Nutella into the batter with a knife. Careful not to overmix.
- Bake the cake for approximately 1 hour and 15 minutes, until a toothpick inserted in the center comes out clean. Let the cool in the pan for 15 minutes.
- Invert the cake onto a wire rack or plate, turn it right side up and let cool completely, about 2 hours. Cut the cake into slices and serve.
Letting the Nutella Swirl Pound Cake cool for those two long, grueling hours while you salivate and smell the deliciousness is going to be the hardest part.
This is one of the best pound cakes I’ve ever had. I had two servings on the spot. You don’t need to garnish it with anything. It’s good enough to devour all on its own.
Tags: Baking, Chocolate, Dessert, Dessert Recipe, Hazelnut, Nutella, Pound Cake

Meyer Lemon Squares
With winter upon us, it’s time for citrus to take center stage as things like oranges, lemons and limes come into season. I was able to pick up some Meyer Lemons from Hollygrove Market and Farm in last weekend’s box.

Dust the Meyer Lemon Squares with powdered sugar before serving.
So what did I do with them? I turned them into delicious Meyer Lemon Squares.
Ingredients:
- Juice from 2 Meyer lemons
- 1 1/2 sticks unsalted butter
- 1 1/2 cups sugar
- 1 1/2 cups plus 1 TBSP plus 1 tsp flour
- 1/2 cup powdered sugar (plus more for dusting)
- 4 eggs
- 2 TBSP grated Meyer lemon peels
Directions:
-
- Preheat the oven to 350°.
- Combine 1 1/2 cups flour and 1/2 cup powdered sugar in large bowl.
- Add butter and cut in until mixture resembles coarse meal.
- Press crust into a 13x9x2-inch baking dish.
- Bake until golden brown (about 25-30 minutes).

These Meyer Lemon Squares are great for the holidays.
- Remove from oven, but leave oven on 350.
- Beat sugar, eggs, Meyer lemon juice, 1 TBSP plus 1 tsp flour and lemon peel in medium bowl to blend.
- Pour into crust then bake until mixture is set, about 20 minutes.
- Once set, remove from oven to let cool.
- Cut into 24 individual squares then sift powdered sugar over top before serving.
These Meyer Lemon Squares should bake to a nice, pillowy consistency. The great thing about using Meyer lemons is that they don’t end up too sour. You can use additional lemon peel in the mixture if you want them more sour.
Give these Meyer Lemon Squares a try at your next holiday function. They definitely deserve a place next to the pecan pie and the pumpkin pie.
Tags: Baking, Citrus, Dessert, Dessert Recipe, Holiday Recipe, Lemon Recipe, Lemons, Meyer Lemons

Banana Soufflé
When life gives you bananas, make soufflés, right? I think that’s how the saying goes. Oh well, either way. These Banana Soufflés are light and fluffy (and require good timing).
The hardest part is whisking the egg whites until they get some nice, soft peaks. You can do it though, just throw some extra elbow grease into it.
Ingredients:
- 2 firm, ripe bananas (mashed)
- 1 TBSP unsalted butter, melted
- 5 TBSP sugar
- 1 egg yolk
- 3 egg whites
- Juice of 1/2 a lime
- Pinch of salt

Caution! Serve immediately or these soufflés will shrivel quickly.
- Preheat the oven to 400°.
- Brush four 1-cup ramekins with melted butter. Add 2 tablespoons of the sugar to one of the ramekins and rotate it to coat with sugar. Tap the excess sugar into another ramekin. Repeat until all the ramekins are coated with sugar.
- In a food processor, puree the bananas with lime juice, egg yolk and 2 tablespoons of the sugar until smooth. Scrape the mixture into a large bowl.
- In a medium bowl, beat the egg whites with a pinch of salt until soft peaks form. (This is the hardest part!)
- Add the remaining 1 tablespoon of sugar and beat until firm and glossy. Using a rubber spatula, beat one-fourth of the beaten whites into the banana mixture, then gently fold in the remaining whites.
- Spoon the soufflé mixture into the prepared ramekins and tap them lightly on a countertop.
- Transfer the soufflés to a baking sheet and bake in the center of the oven for about 15 minutes, or until golden brown and risen. Do not open the oven until they are finished!
Once you pull these Banana Soufflés from the oven, they will start to shrivel up pretty quickly. Mine rose a little more than indicated in the pictures.
These Banana Soufflés are actually fairly healthy. Each only contains about 1 TBSP of sugar so you could do a lot worse. If you get it right, the soufflés should be light, airy and fluffy.
Tags: Banana, Dessert, Dessert Recipe, Souffle, Souffle Recipe, Sugar

Caramel Apple Hand Pies
Hand pies are a New Orleans tradition thanks to local business Hubig’s. Unfortunately, with Hubig’s currently not in operation due to a devastating fire (they promise to rebuild), I had to make my own hand pies to get my fix. But, all in all, I’m proud of how these Caramel Apple Hand Pies turned out.
I’m a huge fan of caramel apples so I whipped up some caramel and mixed it with the apples to create the caramel apple filling.
Ingredients:
For the Caramel:
- 1 cup sugar
- 6 TBSP unsalted butter, cut into cubes
- 1/2 cup heavy whipping cream
- 1/4 cup water

Caramel Apple Hand Pies encompass wonderful Fall flavors.
- 4 pre-made pie crusts
- 2 Granny Smith apples, finely chopped
- 2 Honeycrisp apples, finely chopped
- 2 TBSP cinnamon
- 1 TBSP sugar
- 2 egg yolks
Directions:
For the Caramel:
- Heat sugar and water in a 3-quart saucepan over medium-high heat, stirring to dissolve sugar. When sugar comes to a boil, stop stirring.
- Boil until the liquid sugar turns a dark amber color then add all the butter. The mixture will foam up and thicken.
- Whisk until the butter has melted. Once butter has melted, remove pan from the heat.
- Add the cream (the mixture will foam up again) and whisk to incorporate cream and until mixture is smooth.
- Set aside caramel to cool.
For the Hand Pies:
- Preheat oven to 400F.

Making the caramel from scratch is worth the effort.
- Roll out pre-made pie crust dough and use a 4-inch circular pastry cutter to cut circles out of the dough. Repeat with each dough remains.
- Set dough circles aside on a parchment-lined baking sheet.
- Toss apples with cinnamon and remaining sugar.
- Once caramel has cooled, add apples to the caramel and stir to incorporate.
- Assemble hand pies by place a TBSP of caramel apple filling on a dough circle then placing a dough circle on top. Press edges with fork to seal. (Don’t worry if some filling spills out, keep pressing until sealed.)
- Using a knife, score an X into the top of each pie so filling can vent its heat out while baking.
- Once all pies are assembled (you may need to work in batches if you have one baking sheet), whisk egg yolks in a small bowl. Using a pastry brush, brush each hand pie with the egg wash. Sprinkle each pie with additional sugar, if desired.
- Bake hand pies for 12-15 minutes or until crust turns golden brown.
- Place on a wire rack to cool.
While my recipe is for hand pies, you can also go the traditional route and just make a caramel apple pie using two pie crusts. Either way, the filling in this recipe is a star.
Making the caramel from scratch really makes a difference. These Caramel Apple Hand Pies are perfect for Fall and Winter parties while apples are in season. Plus, they’re easier to eat. And I guarantee you will have very few left over when all is said and done.
Tags: Apple Pie, Apples, Caramel, Caramel Apple, Dessert, Dessert Recipe, Fall Recipe, Holiday Recipe, Pie, Pie Recipe, Recipe

Blackberry Buttermilk Cake
Need a quick cake recipe that’s light on ingredients, but full of flavor? This recipe for Blackberry Buttermilk Cake is the answer to your prayers.
I’m a huge fan of fresh blackberries so this cake has a special spot in my heart. It’s super easy to make and takes 45 minutes from start to finish.
Ingredients:
Directions:
- Preheat oven to 400F.

Who doesn’t love fresh blackberries?
- Grease a 9-inch round cake pan and line with parchment paper. Grease the parchment paper as well.
- In a medium bowl, whisk the flour, baking powder, baking soda and salt.
- In a large bowl, mix together the butter and sugar until fluffy.
- Beat in the egg and vanilla to butter-sugar mixture.
- In three batches, mix in the buttermilk and dry ingredients (ending with dry ingredients).
- Fold the batter until blended, scrape into the pan and smooth the top.
- Scatter the blackberries on the batter and lightly press them in. Sprinkle with additional sugar.
- Bake for 30 minutes or until toothpick inserted into center of cake comes out clean.
- Let cool for 10 minutes then turn out the cake and remove the paper.
- Turn the cake right side up to let cool.
- Serve with whipped cream and more blackberries.
You can always substitute in another fruit in place of the blackberries. I’m actually thinking of trying it with peaches or apples next.
This Blackberry Buttermilk Cake is a great cake that’s not too sweet and gets a nice taste of sour from the blackberries. I highly recommend serving it with the whipped cream.
Tags: Blackberries, Blackberry, Cake, Cake Recipe, Dessert, Dessert Recipe, Whipped Cream

Pumpkin Cupcakes with Maple-Pumpkin Pie Spice Frosting
Halloween’s only a couple days away so here’s a quick recipe that uses a total of five ingredients. That’s it — nothing to be spooked about when making these Pumpkin Cupcakes with Maple-Pumpkin Pie Spice Frosting.
You can decorate them with inedible plastic Halloween decorations or use decorations of the edible variety. These cupcakes don’t set as well as cupcakes made with a traditional batter, but these are easier so it’s a trade-off.

Pumpkin Cupcakes with Maple-Pumpkin Pie Spice Frosting are perfect for Halloween and all of Fall.
- 1 can vanilla frosting
- 1 can pumpkin puree
- 3 TBSP pumpkin pie spice
- 1 box yellow cake mix
- 2 TBSP maple syrup
Directions:
- Preheat oven to 350F.
- In a large bowl, combine pumpkin puree and yellow cake mix and mix together well. This batter will be thick.
- Scoop one heaping TBSP of cake batter for each cupcake into a cupcake liner-lined muffin or cupcake tin.
- While cupcakes are baking, mix together vanilla frosting, pumpkin pie spice and maple syrup in a medium bowl. Transfer into a pastry bag if desired.
- Bake for 25-30 minutes or until toothpick inserted into cupcake comes out clean.
- Let cupcakes cool for 5-10 minutes then top with frosting.
- Repeat until no batter remains.
You’ll probably have some of the Maple-Pumpkin Pie Spice frosting let so feel free to use if for other dishes. These cupcakes don’t rise that much so try and fill up the cupcake lines about 3/4 way to the top.
These Pumpkin Cupcakes with Maple-Pumpkin Pie Spice Frosting may be light on ingredients, but they’re high on ease and simplicity and taste. They’re perfect to take to a Halloween party when you don’t have time to make something very elaborate. Honestly, no one will ever know how simple they are. Happy Halloween!
Tags: Cupcakes, Dessert, Dessert Recipe, Frosting, Halloween Dessert, Halloween Dessert Recipe, Maple Syrup, Pumpkin, Pumpkin Pie Spice, Recipe

Funfetti Blondies
I semi-obsessed with Funfetti cake mix and I fully intended to make Funfetti cupcakes this past weekend, but decided to mix things up and try out some Funfetti Blondies.
The Funfetti experiment was a hit. You get the full-on taste with a firmer texture. Sadly, some of the color is lacking, but this is still a great dessert.
Ingredients:
- 1 1/2 cups Funfetti cake mix

Funfetti Blondies
- 1 egg
- 1 egg yolk
- 1/2 cup brown sugar
- 3/4 cup melted butter
- Seeds from one vanilla bean
- 1/2 cup whole wheat flour
- 1/4 tsp baking soda
- 3 TBSP sprinkles
Directions:
- Preheat oven to 350F.
- Grease an 8-inch square pan and set aside.
- In a large bowl, whisk together egg, egg yolk, brown sugar and vanilla bean seeds.
- Whisk in the melted butter until combined.
- In another large bowl, combine flour, baking soda and Funfetti cake mix, stirring to mix.

Sprinkles make everything better!
- Slowly mix the flour/cake mixture into the wet ingredients until combined.
- Stir in 2 TBSP of the sprinkles (save the remaining TBSP).
- Pour the batter into the greased pan.
- Sprinkle the remaining sprinkles on top.
- Bake for 30-35 minutes or until golden brown.
- Let cool and cut into squares.
Aside from Funfetti’s awesomeness in the cake world, it’s also pretty damn delicious. And while this recipe isn’t cheap on the calorie scale, it’s worth it on the taste scale.
I found these Funfetti Blondies to be pretty sweet so I didn’t add frosting on top, but if you want to add some rainbow chip or vanilla icing, it will make them even more decadent.
Tags: Blondies, Cake Mix, Dessert, Dessert Recipe, Funfetti, Funfetti Cake

The perfect dessert for all the leftover Reese’s from Halloween.
I can’t take credit for this dessert. This one was made by my dear friend Annie Flettrich for one of our Sunday movie nights. She made this Reese’s Peanut Butter Cup Trifle and it was amazing so I’m sharing with the world.
My love of Reese’s Peanut Butter Cups is well-known and this dessert satisfied my love of Reese’s. It’s so light and airy that you totally forget about all the calories.
Ingredients:
- 1 store-bought angel food cake
- 2 (3-ounce) packages instant chocolate pudding mix
- 3 cups milk
- 3/4 cup creamy peanut butter
- 16 ounces Cool Whip
- 8 Reese’s Peanut Butter Cups (crushed)

Reese’s Peanut Butter Cup Trifle
- Crumble the angel food cake and set aside.
- Beat the chocolate pudding mix and milk together until blended.
- Beat together one cup of Cool Whip and all of peanut butter.
- In a large trifle bowl, layer 1/2 the crumbled cake, half the chocolate pudding and half the peanut butter mixture.
- Smooth half of remaining Cool Whip on top and sprinkle with half of crushed Reese’s Peanut Butter Cups.
- Repeat with another layer of cake, chocolate pudding, peanut butter mixture, Cool Whip and Reese’s.
- Chill for four to six hours or overnight then serve.
Chocolate and peanut butter is a food lover’s dream combo. At least, for me, it is. So this dessert is perfect for the chocolate and peanut butter lovers.
If I could serve it to trick or treaters by plopping a spoonful in their bags, I would, but I guess I’ll have to buy some other candy this year. This is great for adult trick or treaters though.
Tags: Angel Food Cake, Chocolate, Cool Whip, Dessert Recipe, No Bake, No Bake Dessert, Peanut Butter, Recipe, Reese's, Reese's Peanut Butter Cups, Trifle

Coconut-Pineapple Upside-Down Cake
I was nervous when I made this Pineapple-Coconut Upside-Down Cake. Why? Admittedly, I’m not the best baker although I’m getting a lot better. Also, I was cooking this as a birthday cake for my mom so no pressure or anything.
Turns out my worrying was unwarranted. This cake is moist, delicious and full of tropical flavor. I made it while I was on vacation so I didn’t have access to my iron skillet, but I’m sure using it would have taken it to another level. That said, the level this cake is on is already pretty high.
Ingredients:
For the topping:
For the cake:
- 1 stick unsalted butter, softened
- 1 cup sugar
- 3 eggs
- 2 tsp vanilla extract
- 1 1/2 cup all-purpose flour
- 2 tsp baking powder
- 2 tsp cardamom
- 1/2 cup unsweetened pineapple juice
- 1/2 tsp salt
- 1/4 cup coconut flakes, plus another 1/4 cup toasted coconut flakes
Directions:
- Preheat oven to 350F.
- For the Topping: Melt the butter in a well seasoned 9” cast-iron skillet or pot (if using cake pan), over medium-high heat. Melt the brown sugar with salt, stirring constantly, until bubbling, about 6 minutes. Remove from heat, add pineapple rings in one even layer in skillet or round cake pan, and set aside.

The topping for Coconut-Pineapple Upside-Down Cake
- Mix the butter in a large bowl until light and fluffy. Add the sugar and beat until creamy.
- Add the eggs, one at a time, beating well after each addition.
- Add 1/4 cup coconut flakes and stir in. Beat in vanilla and Malibu coconut rum.
- In a separate bowl, combine the flour, cardamom, baking powder, and salt. Add half of the flour mixture to the egg mixture and beat on low speed just until blended.
- Add the pineapple juice and mix to incorporate, add remaining flour mixture, beating until just incorporated.
- Spoon the batter over the pineapple/brown sugar topping, smoothing the top evenly.
- Bake on the center rack of the oven until golden brown and a skewer inserted in the middle comes out clean, 45 minutes to 1 hour. Remove from the oven and let stand for 5 minutes.
- To remove from the skillet, run a sharp knife around the edge to release the sides. Invert a cake plate or service platter over the skillet and invert the cake onto the plate, keeping pan and plate firmly pressed together. The cake should drop from the skillet onto the plate.
- Drizzle the cake with additional Malibu coconut rum, top with toasted coconut flakes, and serve.
I made this Pineapple-Coconut Upside-Down Cake while I was on vacation at the beach and it really fit the bill for a beach birthday.
If you’re a fan of coconut and/or pineapple this is the cake for you. I also envision this recipe making some great cupcakes if you place a single pineapple ring in each cupcake slot.
Tags: Baking, Cake, Caramel, Coconut, Dessert, Dessert Recipe, Pineapple, Pineapple Upside Down Cake, Upside-Down Cake